This article first appeared in the SQLServerGeeks Magazine.
Author: Satya Ramesh.
Subscribe to get your copy.
In this blog we will prove the point that both the truncated and deleted data can be rolled back, if they are used in certain transactions with a proper database backup and restore mechanism.
Without any further delay let’s get in to the demos. Let’s create TruncatevsDelete database and then two tables DeleteTest & TruncateTest
--Step 1: Execute the following statement(s) to create a database
USE [master];
GO
IF EXISTS ( SELECT  name
            FROM    sys.databases
            WHERE   name = 'TruncatevsDelete' )
    	ALTER DATABASE TruncatevsDelete SET SINGLE_USER WITH ROLLBACK IMMEDIATE;
DROP DATABASE TruncatevsDelete;
GO
CREATE DATABASE TruncatevsDelete;
GO
--Step 2: Execute the following statement(s) to create tables
USE TruncatevsDelete;
GO
--Query 1:
CREATE TABLE DeleteTest
    		(
      		id INT IDENTITY(1, 1) ,
      		Test CHAR(20) DEFAULT 'Operation DELETE'
    		);
GO
--Query 2:
CREATE TABLE TruncateTest
    		(
      		ID INT IDENTITY(1, 1) ,
      		Test CHAR(20) DEFAULT 'Operation TRUNCATE'
    		);
GO
Perform a full database backup before inserting the data into the tables.
--Step 3: Execute the following statement(s) to take full backup of TruncatevsDelete database.
USE [master];
GO
BACKUP DATABASE TruncatevsDelete
TO DISK = 'C:\SQLMaestros\TruncatevsDelete.BAK'; -- Backup path may vary in your case
GO
Now, insert five records each into the tables.
--Step 4: Execute the following statement(s) to insert records into the tables
USE TruncatevsDelete;
GO
INSERT  INTO dbo.DeleteTest
        	DEFAULT VALUES;
GO 5
INSERT  INTO dbo.TruncateTest
        	DEFAULT VALUES;
GO 5

--Step 5: Execute the following statement(s) to view the records in the table
SELECT  *
FROM    dbo.DeleteTest;
SELECT  *
FROM    dbo.TruncateTest;
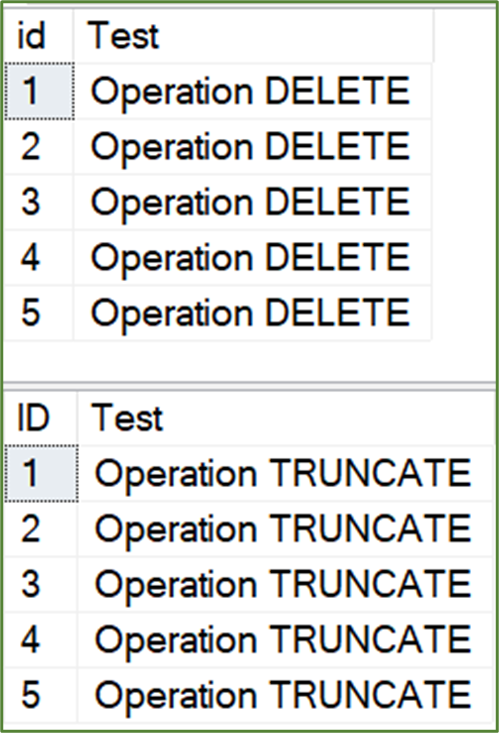
So, we have five records in DeleteTest table and another five in TruncateTest table. Let’s assume that our developer, by mistake deleted some data from the table DeleteTest and truncate the table TruncateTest. So, execute the below statement(s).
--Step 6: Execute the following statement(s) perform delete and truncate operations
USE TruncatevsDelete;
GO
--Query 1: Delete Operation
DELETE  FROM dbo.DeleteTest
WHERE   id <= 3;
GO
--Query 2: Truncate Operation
TRUNCATE TABLE dbo.TruncateTest;
GO
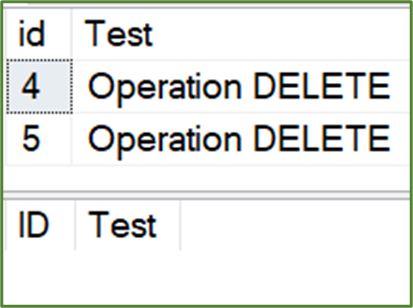
So, let’s go ahead and view the tables status again. We’ve only two records in DeleteTest table and they have no records in TruncateTest table.
--Step 7: Execute the following statement(s) to view the records in the table
SELECT  *
FROM    dbo.DeleteTest;
SELECT  *
FROM    dbo.TruncateTest;
So, immediately after the delete and truncate happens, we need to check when this particular transaction has been started and we need to record the log sequence numbers of these transactions. So, let’s execute this particular query.
--Step 8: Execute the following statement(s) to read the data from transaction log
SELECT  [Current LSN] ,
        Operation ,
        [Transaction ID] ,
        [Begin Time] ,
        [Transaction Name] ,
        [Transaction SID] ,
        AllocUnitName
FROM    fn_dblog(NULL, NULL)
WHERE   [Transaction Name] IN ( 'DELETE', 'TRUNCATE TABLE' );
The undocumented function fn_dblog accepts 2 input parameters. First parameter is starting LSN and second parameter is ending LSN. So, if we pass NULL to both the parameters, we get all the data from the log file. So, the query also filters out only the transaction whose name is DELETE or TRUNCATE. So, the query results are below.

Let’s note down the CurresntLSN numbers of the last two transactions. So, first number (00000025:00000348:0001) is where our delete transaction has started and second number (00000025:00000350:0001) is where our truncate transaction has started. Then perform the log backup because SQL Server logs whenever inserts, deletes and truncate etc. happens. So, let’s go ahead and perform the log backup.
--Step 9: Execute the following statement(s)  to log backup of TruncatevsDelete database
USE master;
GO
BACKUP LOG TruncatevsDelete TO DISK = 'C:\SQLMaestros\TruncatevsDelete.TRN';
GO
Once the log back up is successful, perform the database restore using the backup file to create a new database.
--Step 10: Execute the following statement(s) to restore the full backup with norecovery
RESTORE DATABASE TruncatevsDelete_DeleteCopy
    FROM DISK = 'C:\SQLMaestros\TruncatevsDelete.BAK'
WITH
    MOVE 'TruncatevsDelete' TO 'C:\SQLMaestros\TruncatevsDelete.mdf',
    MOVE 'TruncatevsDelete_Log' TO 'C:\SQLMaestros\TruncatevsDelete_Log.ldf',
    REPLACE, NORECOVERY;
    GO
Let’s restore the log file also to complete the backup process. While appending the log data, observe the syntax, we are restoring the data from log file and stopping the process at a particular LSN number. This LSN number will vary in your case. Why are we doing this? Whenever a transaction starts, SQL Server record the log SQL number in the log file. So now we’re telling SQL Server that restore the data from the log file and whenever you encounter this particular LSN number stop there. Which means this particular LSN number is where our delete transaction has started. So, before this transaction has been started our data is there in the database. Only after this transaction started our data got deleted. So, now we are restoring the file to a certain state that SQL Server delete operation has never started.
Note that, the LSN number is a hexadecimal number. We need to convert the number to decimal number and then pass the decimal value to the STOPBEFOREMARK attribute.
Note: Convert the hexadecimal LSN we got for DELETE operation (which we got at step 8) to decimal number. In this case the LSN is 00000025:00000348:0001. Let us divide the LSN into three parts. Part 1– 00000025, Part 2- 00000348 and Part 3- 0001. We will individually convert each part into decimal number. The decimal number of Part 1 is 37, Part 2 is 840 and Part 3 is 1 (use any online converter). Let us add all three parts together, add Part 1 as it is (37), round of Part 2 to 10-digit number by adding leading zeros (0000000840), round of Part 3 to 5-digit number by adding leading zeros (00001). The final decimal number is 37000000084000001. Replace the LSN in the following query with LSN we calculated now.
--Step 11: Execute the following statement(s) to restore Log backup with STOPBEFOREMARK option to recover exact LSN
RESTORE LOG TruncatevsDelete_DeleteCopy
FROM
    DISK = 'C:\SQLMaestros\TruncatevsDelete.TRN'
WITH
 STOPBEFOREMARK = 'lsn:37000000084000001'; -- LSN value will vary in you case
Let’s execute the below query. BOOM. Our deleted data is back.
--Step 12: Execute the following statement(s) to verify whether records are back into table or not
USE TruncatevsDelete_DeleteCopy;
GO
SELECT  *
FROM    dbo.DeleteTest;

Let’s DROP the database we created to rollback the deleted data
--Step 13: Execute the following statement(s) to drop the database
USE master
GO
DROP DATABASE TruncatevsDelete_DeleteCopy
GO
Now let’s repeat the same process to rollback the truncated data.
--Step 14: Execute the following statement(s) to restore the full backup with norecovery
RESTORE DATABASE TruncatevsDelete_TruncateCopy
    FROM DISK = 'C:\SQLMaestros\TruncatevsDelete.BAK'
WITH
    MOVE 'TruncatevsDelete' TO 'C:\SQLMaestros\TruncatevsDelete.mdf',
    MOVE 'TruncatevsDelete_Log' TO 'C:\SQLMaestros\TruncatevsDelete_Log.ldf',
    REPLACE, NORECOVERY;
    GO

--	ALTER DATABASE TruncatevsDelete_TruncateCopy SET RECOVERY
--Step 15: Execute the following statement(s) to restore Log backup with STOPBEFOREMARK option to recover exact LSN
RESTORE LOG TruncatevsDelete_TruncateCopy
FROM
    DISK = 'C:\SQLMaestros\TruncatevsDelete.TRN'
WITH
    STOPBEFOREMARK = 'lsn:37000000084800001';

--Step 16: Execute the following statement(s) to verify whether records are back into table or not
USE TruncatevsDelete_TruncateCopy;
GO
SELECT  *
FROM    dbo.TruncateTest;

WOW. Our truncated data is back.
-----------------------
--Begin: Cleanup
-----------------------
USE master
GO
DROP DATABASE TruncatevsDelete_TruncateCopy
GO
DROP DATABASE TruncatevsDelete
---------------------
--End: Cleanup
---------------------
Summary: It is clear that truncate and delete both can be rolled back. And also proves that the TRUNCATE operation does write some amount of log using which we can roll back the data.
Hope you enjoyed the read. Thank you.
This article first appeared in the SQLServerGeeks Magazine.
Author: Satya Ramesh.
Subscribe to get your copy.