Hello Friends,
In my previous blog posts about temporal tables, we have seen three different ways for the creation of a temporal history table. First was the default where SQL Server create the table and assign a default name to that table. Second was where we specify the name of that table and SQL Server will create the history table with that name. In both of the cases, structure of the history table was same and table was having one clustered row store index. In the third, we have seen the support for column store indexe. You can click here for Part1 and Part2.
Today we will take a look about a scenario, where we want to covert the existing non temporal table to the system version table. Here existing table is already having data into it.
For the demo purpose, I am using an AdventureWorks sample database for SQL Server 2016 CTP 3 on SQL Server 2016. I’ll create the demo table almost similar to [Sales].[CreditCard]. Then I’ll populate this table with the data from [Sales].[CreditCard].
USE [AdventureWorks2016CTP3]
GO
SET ANSI_NULLS ON
GO
SET QUOTED_IDENTIFIER ON
GO
CREATE SCHEMA TEST;
GO

CREATE TABLE [Test].[CreditCard](
	[CreditCardID] [int] IDENTITY(1,1) NOT NULL,
	[CardType] [nvarchar](50) NOT NULL,
	[CardNumber] [nvarchar](25) NOT NULL,
	[ExpMonth] [tinyint] NOT NULL,
	[ExpYear] [smallint] NOT NULL
 CONSTRAINT [PK_CreditCard_CreditCardID] PRIMARY KEY CLUSTERED
 (
	[CreditCardID] ASC
 )WITH (PAD_INDEX = OFF, STATISTICS_NORECOMPUTE = OFF, IGNORE_DUP_KEY = OFF, ALLOW_ROW_LOCKS = ON, ALLOW_PAGE_LOCKS = ON) ON [PRIMARY]
) ON [PRIMARY]
GO

INSERT INTO [AdventureWorks2016CTP3].[Test].[CreditCard]
(	   [CardType]
      ,[CardNumber]
      ,[ExpMonth]
      ,[ExpYear]
)
SELECT [CardType]
      ,[CardNumber]
      ,[ExpMonth]
      ,[ExpYear]
FROM [AdventureWorks2016CTP3].[Sales].[CreditCard]
GO
Now, I’ll try to convert this Test.CreditCard non temporal table to system versioned temporal table. I’ll add two columns of datetime2 data type with default values and also specify PERIOD FOR SYSTEM_TIME on both of these columns. Finally, I’ll do the system versioning ON. In our case, we are creating a new history table, so we can turn the data consistency check to off.
ALTER TABLE [Test].[CreditCard]
ADD
    RecordLifeStart datetime2(0) GENERATED ALWAYS AS ROW START HIDDEN CONSTRAINT DF_RecordLifeStart DEFAULT SYSUTCDATETIME(),
    RecordLifeEnd datetime2(0) GENERATED ALWAYS AS ROW END HIDDEN CONSTRAINT DF_RecordLifeEnd DEFAULT CONVERT(datetime2(0), '9999-12-31 23:59:59'),
    PERIOD FOR SYSTEM_TIME (RecordLifeStart, RecordLifeEnd);
GO
ALTER TABLE [Test].[CreditCard] SET (SYSTEM_VERSIONING = ON (HISTORY_TABLE = [Test].[CreditCard_History], DATA_CONSISTENCY_CHECK = OFF))
GO
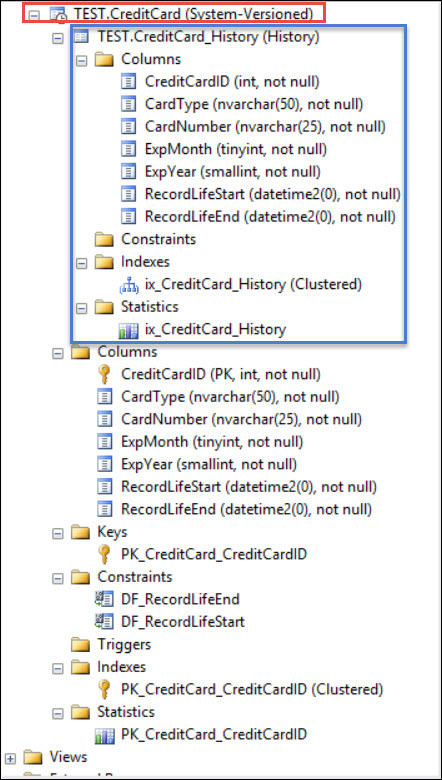
From Object Explorer, you can check that table has been converted to system versioned temporal table.
In the next blog post we will look about querying the temporal tables.
HAPPY LEARNING!
Regards:
Prince Kumar Rastogi
Like us on FaceBook | Join the fastest growing SQL Server group on FaceBook
Follow Prince Rastogi on Twitter | Follow Prince Rastogi on FaceBook