Hi Folks,
You would have seen my several article posts related to security point-of-view. But this post is all been concentrated upon the fact that, how it can be secured enough even at the Database Level.
The user can only be granted access to the individual databases, if the user has gained rights to access the server.
The users have initially granted access to the databases by adding them to the database.
Guest Logins:
- Those user who wants to access the database, but not has been added as a user within the database, will automatically be granted the user privileges of the Guest Database User, if and only if, the Guest User account would have exists.
- In the SQL Server 2008 R2, the Guest user has been included automatically, unlike the previous versions, where we had to add this manually.
- If you are using the previous version, then you can add this Guest User manually like this:
EXEC sp_adduser 'Guest'
- To be there in the safer side, do remove the Guest User, if it is no longer required.
Granting Access to the Database:
- Granting Access to the Database can either be done from the login side or from the database side.
- This is so because there is a many-to-many relationship between the login and the database. One login can have many databases, at same time one database can also have many logins.
From the Login-Side:
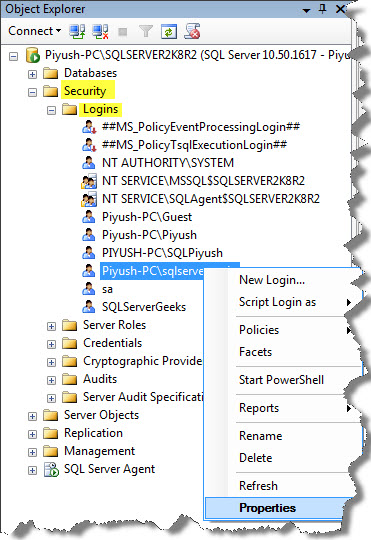
1. Go through this:

2. Now, in the Login Properties Page, go to User Mappings, and then select the Database which you want to add into the Login account. Don’t bother much about the Database role here, will deal it with later on:

From the Database-Side:
1. In the left-pane, Select the Database name, then the Security, and then on User’s.

2. Now, in the Database Use-New window, it can be seen as:

Here, you can see that the login can also be assigned a database username, which can be same as the Login name, or some other name by which the login will be known within the database. As you can see from above, we have given here User Name as “SQLServer”.
The Login Name can so be browsed down or can be searched with the “…” button.
You can also specify the Default schema for which you want to grant the access; here I had selected [dbo].
Leave both the options “Owned Schemas” and “Role Members” for the time being, will cover later in this article.
Alternative:
You can also be able to grant an access to the database with the help of Stored Procedure within the database as:
USE School
EXEC sp_grantdbaccess 'Piyush-PC\sqlservergeeks'
If you want to give an alternative user name to your login account, you can also specify that as:
USE School
EXEC sp_grantdbaccess 'Piyush-PC\sqlservergeeks', 'SQLServer'
If you want to drop this login name, then:
USE School
EXEC sp_revokedbaccess 'Piyush-PC\sqlservergeeks'
Well this was enough for this article-post. In the next article-post, I would like to deal with various fixed Database Roles.
So Keep Tuned!
And also post comments on this!!
Regards
Piyush Bajaj
Like us on FaceBook | Follow us on Twitter | Join the fastest growing SQL Server group on FaceBook
Follow me on Twitter | Follow me on FaceBook
