Hello Folks,
You would have seen my previous article-post, which deals with SQL Server Authentication Mode. If somehow you have not gone through it or want to refer it again, just browse the link;
Well, in this article-post I will like to deal with Windows Authentication Mode. Using this also, server can be secured.
Windows Authentication Mode:
- Since you don’t have to put yet another password, so this makes Windows Authentication Mode much superior than a Mixed Mode.
- This feature maximizes the security design of the network.
- If the user uses Windows Authentication Mode, so they must exist as a Windows User, if they want to be recognized by SQL Server.
- Therefore, the Windows Security Identifier (SID) is being passed from Windows to SQL Server.
- Windows Authentication is so much robust, that not only will authenticate Windows User, but also the users within the Windows User Group.
- The windows user groups are of two types, i.e., Standard User Group and Administrator Group. So, if you are admin of the Administrator Account, then you have full rights to create a customer user group.
- SQL Server also has the knowledge of actual windows username, so the application can gather audit information at both the user level and the group level.
Now, we will go on to discuss:
- How to Add a new Windows login?
- How to Remove a Windows login?
- How to Deny a Windows login?
- How to set the Default login?
- How to treat with Orphaned Windows Users?
In a while, you also will be able to answer all these questions 🙂
How to add a new Windows Login?
Well, windows users are created and managed in various places in the different Windows versions. In Windows 7 and Windows Vista, this is how the local users can be managed (it’s almost the same in rest of the windows also). So follow these simple steps to add a new Windows Login, and watch it carefully 🙂
Step 1: Go through Control Panel -> Administrative Tools -> Computer Management. Hope you got it!
Step 2: Computer Management Windows shows up, and you can see the current users list:

Step 3: So, if you want to create a new user, click on the “New User…”
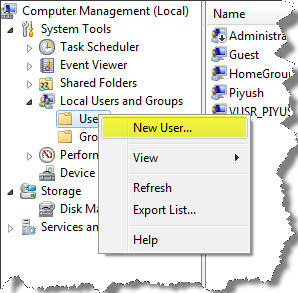
Step 4: Now, input the name of the user and then click the Create button.
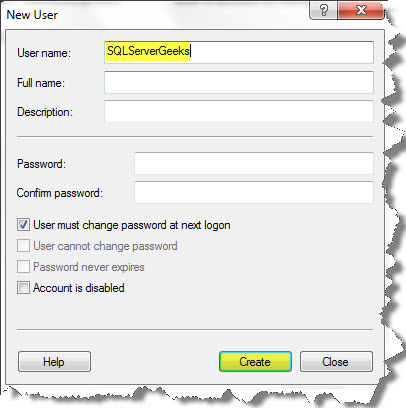
Step 5: Well, you have created the new User “SQLServerGeeks”. You can also see it in the users list:

Step 6: The Windows user exist in the Windows user list or the Windows domain, and SQL Server recognizes them easily.
Now, what we have to do is that, we have to add a new login to SQL Server. So, it can be done in either of the following two ways:
- Using these five-step process, or
- Via Stored Procedure in T-SQL.
5-Step Process:
1. In your MS SQL Server Management Studio, click the “New Login…”
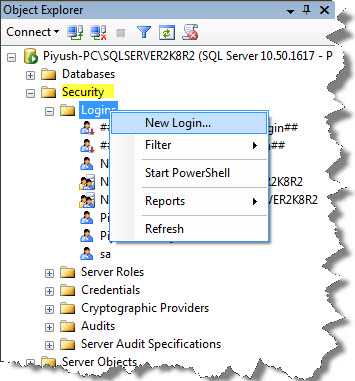
2. Login-New window will flash up, click on the Search button:

3. Check the name of the object, whether it is available or not. Click on Check Names.
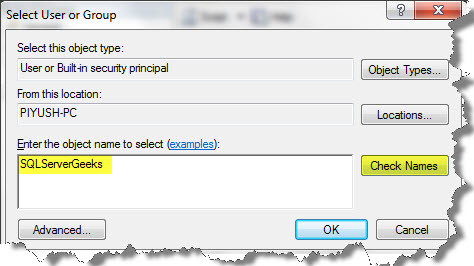
4. Yes, the object name exists and is being identified. Click on Ok.

5. In the Login-New, click on Ok.
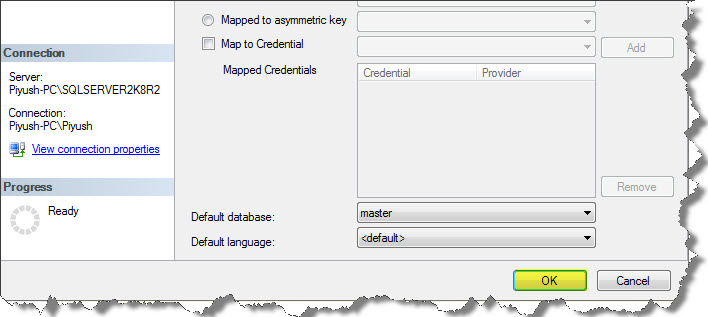
Assigning a default database does not automatically grant access to that database. Well, a new Windows login is being created.
Via Stored Procedure in T-SQL:
Just make sure you use the full Windows Username, including the domain name as follows:
EXEC sp_grantlogin 'Piyush-PC\SQLServerGeeks'
The login is being added.
Well, you can also review the Windows Logins with the query:
SELECT * from sys.server_principals

Well, this was all about “How to add a new Windows Login”.
In the next article post, I would deal with the rest of the topics I have mentioned above. Keep Tuned!!!
Hope you got it understood well 🙂
And also comments on this!!
Regards
Piyush Bajaj
Like us on FaceBook | Follow us on Twitter | Join the fastest growing SQL Server group on FaceBook
Follow me on Twitter | Follow me on FaceBook
